61 Locations Nationwide (800) 838-7995
We're here to help. (800) 838-7995
Schedule a Free Consult
Schedule Your
Free Design Consultation
Free Design Consultation
 There is nothing more exciting than taking a part of a home and watching the transformation from what “was” to what “could be” and making it an incredible space. When I met with a client in the Los Angeles area, he asked me to help him with his garage. Garages are usually the most exciting because the Before & After pictures can be so drastic. This one turned out to be no different. As soon as we worked on the design and got started, we set the project up in stages.
Stage 1: The Clean Up
When doing a project in the garage, all personal items must be removed. It is the perfect time to eliminate things you do not need and only keep what you want. For those people that have a lot of things stored in their garage, you can rent a temporary storage pod. It will be delivered on your driveway and you can rent them for the duration of your project.
This client removed many of his personal items to get ready for the next stage of his project. It does show a good view of an empty garage that is not that attractive.
Stage 2: The Preparation
In this stage remove any old cabinets that have been installed and won’t be used. This garage had an old workbench on the back wall and overhead shelf on the left wall. Both were taken out, and the old materials were discarded. Some garages are unfinished with studs exposed. There are two options in this case, install backing in all of the cabinets or finish the walls with drywall and a fresh coat of paint. The latter choice looks the best.
This client opted not to finish the ceiling and leave the rafters open for extra storage. However, lighting was poor with old florescent lights. Nine new light fixtures were added to give adequate light during any time day or night. Prior to drywall we determined where the client would need electrical outlets. Three plugs were placed on the back wall in strategic positions. Two were placed on the right wall which will be above the top of the desk area. All outlets and lights were placed prior to any drywall being installed.
Stage 3: Flooring
Many clients do not consider changing flooring because their cars will still be parked in the garage. There are many durable options available that can change the look of the space immediately and look much better than plain cement.
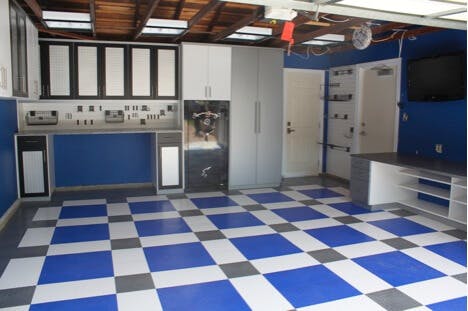
This client opted for Race-deck flooring tiles. The Closet Factory Installers came in and completed the floor in half of a day. The flooring was able to be cut around the safe that was bolted to the floor and the edges of the walls.
Stage 4: The Cabinets
After the garage walls have been prepped and the flooring completed, it is time for the cabinets. This garage was transformed in three days. The Closet Factory Installers take their time with every detail. They pay attention to how everything is going to work and do not waste one inch of space. Notice how the cabinets were built around the safe to give the safe a built-in look.
Once they complete the work, the Installers clean everything thoroughly so it is ready to move in. They take pride in what they do and love when clients are excited with the end result.
Stage 5: Move In
Now that everything is completed, it is time to move all of the items back into the garage. With enclosed cabinets, the perfect work area and a garage that looks like a showroom, it is easy and fun to put everything away. From one extreme to the other, this is now a space the client will love to work, work out and spend time. What makes me excited is we have another happy Closet Factory client who refers us to everyone he knows.
Written by: Kathryn LaBarbera of Closet Factory Los Angeles
Other Garage Articles:
The 7 Steps to Garage Organization
Garage Tips: Eliminate, Categorize and Organize for More Space
Each of our custom systems is completely personalized and begins with a complimentary design appointment.
Schedule a ConsultDuring the consultation you and a designer will discuss your expectations, desires, and project budget, with the aim of designing an organization system that will: