61 Locations Nationwide (800) 838-7995
We're here to help. (800) 838-7995
Schedule a Free Consult
Schedule Your
Free Design Consultation
Free Design Consultation
If you take shots of interior spaces like closets often and find that your photos aren’t exactly the way you would like them to be, then it might be because of your camera settings, position in relation to the target, lighting, or some combination of all three.
This post won’t go into your camera settings in great detail. However, it will touch on them briefly, as we go over the general methods of getting a good shot that encompasses the true beauty and essence of your closet system. Remember, there are different kinds of photography, and each one has its own requirements.
It is difficult to take good pictures without understanding one thing, and that is ISO.
In simple terms, ISO is the level of sensitivity of your camera to available light. The lower the ISO number, the less sensitive it is to light. Conversely, the higher the ISO number, the higher the sensitivity. When your camera is more sensitive, it can take pictures in low-light settings without flash. However, a high ISO setting adds “noise” to pictures, as you can see below.
In general, you want to use low ISO settings whenever you can, combined with real natural light. This preserves most of the details of your picture and provides the highest image quality. You should only increase the ISO when there isn’t enough light for the camera to capture an image quickly, such as in shadowy spaces with no available light source.
If you have no idea how to set your camera settings on your phone, here is a set of pictures that break it down into easy steps:
Open your camera app and press the gear icon on the top right.
Press ISO.
Choose an ISO. Done.
Press an area on the screen to focus. Move the little sun icon up and down. Up is high ISO, and down is low ISO. Easy right?
Most of your closet photos look bad because you don’t put the camera into focus. In other words, you aren’t pressing an area on the screen and waiting for a little green (or yellow for iOS) square to show up along with a “ji-ji” sound. Essentially, taking a picture without doing this is going to result in blurry, unimpressive photos. Good closet photos require you to be still and patient. Taking a photo while the camera is trying to find a focus point is pretty much the same as trying to take a picture of an ambulance speeding by at over 80 miles per hour.
See that square? Take the picture when you see it.
One of the most important tips to taking great pictures of your closets, walk-in or reach-in, is to focus on the corner of the space. Doing this makes the closet space appear larger and lively. Shooting straight at a wall can make the space seem flat, and can make objects look like they’re “bending.” Take this walk-in closet for example: shooting into the corner of the unit makes the walk-in look larger than it actually is.
For those who enjoy doing “before-and after” photos of their closets, the key to creating great ones is to show as much contrast between the two as possible. After all, you’re trying to highlight the change that occurred after you applied an organizational method or installed a new closet system.
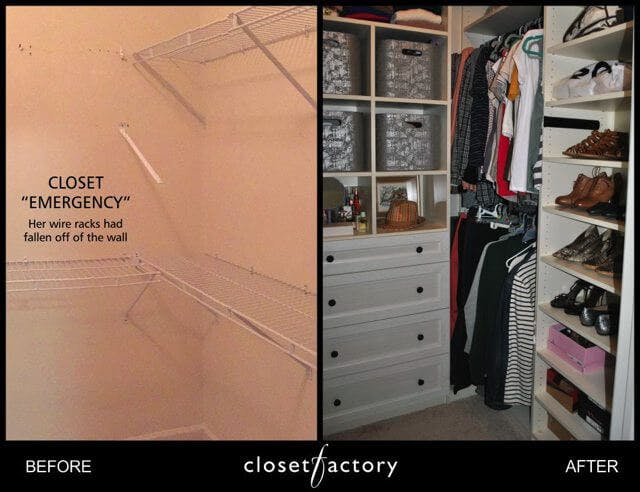
For before photos, you’re obviously going to have much more clutter in them. The most important thing to remember is that you’re trying to highlight the main problem and make it stand out — whether it’s a cluttered closet or a shoddy wire system. In addition, don’t forget to shoot into the corner of your closet to encompass as much of the mess as possible into the picture.
For after photos, not much changes except now you’re focusing on the area that has changed the most, whether it was a removal of mess or a new shelf installation. Remember to shoot once again into the corner to get as much closet in the picture as possible.
A flash can be your ally in dark settings, but it can also be your worst enemy. If there is enough natural light in your setting, always use it instead. Here is a picture that represents what happens when you use flash when you don’t need it as opposed to no flash.
While there are several more methods for getting the best image of your closet or aspects of your interior, these should, at the very least, help your photos appear more presentable. In the end, just go out there and shoot! You’ll soon find methods that work for you.
Each of our custom systems is completely personalized and begins with a complimentary design appointment.
Schedule a ConsultDuring the consultation you and a designer will discuss goals, desires, and project budget, with the aim of designing an organization system that will: